Endpoint privilege management allows standard users to run specific, approved applications only when needed and admins rights are not required to complete tasks. In this post, we will talk about use to EPM and how this feature works and concepts. Currently, this feature is in public preview, and we can use without license and after public review, it will be available as Intune addon. This is applicable to Windows 10 & 11 machines.
In recent years, cyber-attacks have become more complex and Microsoft researchers found 130% increase in organizations that encountered ransomware and 74% of data breach came from privilege access credential. Organizations now needs a new security model that protects apps, devices, and data wherever they are located.
If IT admins choose to run all employees as local IT administrators then organizations left vulnerable to attackers and if we make all employees as standard users, there will be more tasks for help desk staff to support incidents as the users have restricted access. If standard users are given with admin rights to perform any one of tasks and it’s not revoked, then there will be additional tasks to perform auditing and manual work. To minimize the workload, Microsoft has come up with Endpoint privilege management solution in Intune. We can manage standard users in controlled way and IT admin can set policies that allow standard users to perform tasks which administrator performs usually.
Prerequisites:
- EPM solution does not require licensing during public preview and once it becomes generally available, tenant must be licensed with Endpoint privilege management and the license is part of Intune suite or standalone license.
- EPM solution supported for below operating systems
- Windows 11, version 22H2 (22621.1344 or later) with KB5022913
- Windows 11, version 21H2 (22000.1761 or later) with KB5023774
- Windows 10, version 22H2 (19045.2788 or later) with KB5023773
- Windows 10, version 21H2 (19044.2788 or later) with KB5023773
- Windows 10, version 20H2 (19042.2788 or later) with KB5023773
- It supports Hybrid Azure Active Directory join or Azure Active Directory joined devices and not supported for workplace join devices.
Enable Endpoint privilege management for your tenant:
- Sign in to Microsoft Intune Admin Center and go to -> Endpoint Security -> Endpoint privilege Management, Select Activate. Once activated, EPM component will be available to configure policies & elevation rules and deploy to your devices.

Configure Windows Elevation Settings Policy:
Once Endpoint privilege management component enabled, you would need to configure windows elevation settings policy and deploy to users or devices. This policy will enable endpoint privilege management on the device. Create windows elevation settings policy in Intune admin center.
- Sign in to Microsoft Intune Admin Center and go to Endpoint security -> Endpoint privilege management. Under policies tab, click Create Policy and choose platform “Windows 10 and later” and profile “Elevation settings policy” and click create.

On the Basics page, specify name for the profile and provide description and click Next.

On the Configuration settings page, enable Endpoint privilege management and configure default elevation response to respond elevation requests for files and the users will receive the single prompt to run the file. If you configure Business justification & Windows authentication for validation purpose, two additional prompts will be displayed to provide justification & authenticate using organization credentials. In Reporting scope, specify what type of information the device reports to Microsoft Intune and Click Next.

On the Scope tags page, specify required scope tag and click Next.

On the assignments page, select users or devices group to deploy the policy and you can also exclude the group and Click Next.

On the Review + create page, review configured settings and click Create. Once policy is created, it will apply to devices.


Configure Windows Elevation rules policy:
Sign in to Microsoft Intune Admin Center and go to Endpoint security -> Endpoint privilege management, Click Create policy and specify platform “Windows 10 and later” and profile “Elevation rules policy” and Click Create.

On the Basics page, specify name for the profile and description and click Next.

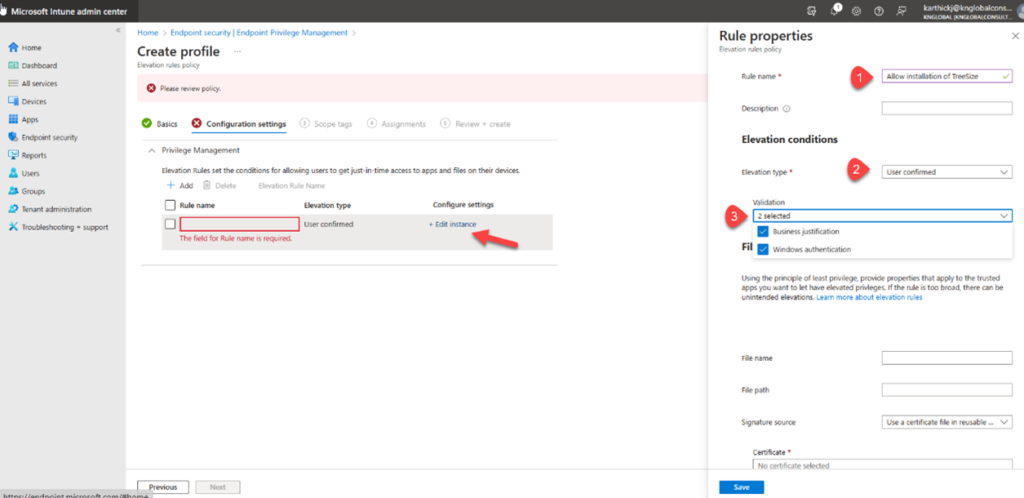
On the configuration settings page, add the rule for each file and there is a rule by default and elevation type is user confirmed. Click Edit instance to open properties and configure the settings.
- Rule name: Specify the name for the rule
- Description: Specify the description for the rule and its optional.
- Elevation type: By default, user confirmed is configured so the user will receive single prompt to confirm intent to run the file. If you specify Business justification, Windows authentication and there will be additional two prompts (Justification & organization credential) to run the file.

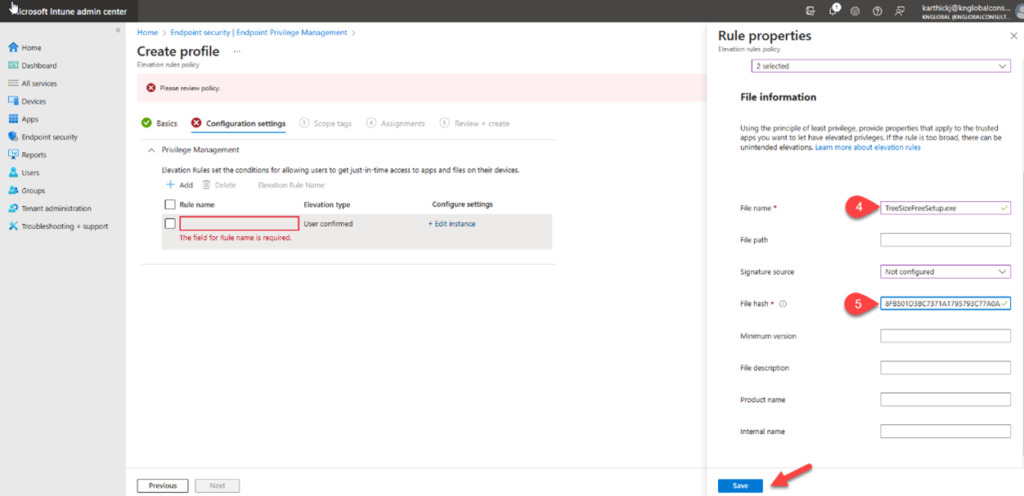
- File name: Specify the file name with extension that you run on the device.
- File Hash: Run the below PowerShell cmdlet to get the hash file information. Click Save to save the rule configuration.


Elevation rule is configured, click add to add additional rules for this policy and click Next.

On the scope tags page, select the required scope and click Next.
On the assignment page, select the users or devices assignment groups to deploy the policy and click Next.
On the Review + Create page, review the configured policy settings and click create to configure policy. It will be listed under policies tab. The assigned elevation rules policy will be available as a DAT-file in C:\Program Files\Microsoft EPM Agent\Policies\ElevationRules on the device.

End User Experience:
After EPM enabled and required elevation policy & rules are deployed, the user can now run the file with elevated access. The user must provide business justification & windows authentication credential to run the file. When you right click the file, you will see Run with elevated access option.

The user gets prompt to provide business justification & authentication to run the file.


