Microsoft announced multiple Copilots in the last 6 months. Most of them are still in the development stage and are available in Private Preview.
Fortunately, Copilot for Power Automate is available as a Public Preview feature and you can test it right away.
This version is available only in specific regions and has some limitations. If you find something unusual or a bug, don’t worry. This is an early beta version.
Copilot for Power Automate is Here …
Power Automate has got its own Copilot and you can test it right now.
It’s in a Public Preview and has many limits but it’s quite powerful and shows what’s coming to the Power Platform. In this post, I will show you how to start with Copilot, how to create your first flow, and what’s new in Flow Designer.
Power Automate Copilots are only available in the United States or Preview (United States) region created in Power Platform.
How to Check Your Environment?
You can check all your environments on the Environments page in the Power Platform admin center (Power Platform admin permissions are required).
- Navigate to the https://admin.powerplatform.microsoft.com/environments site
- Check the region of your environments

If you don’t have any environment in the supported regions, you can create a new one.
- Click the + New button on the Environments page
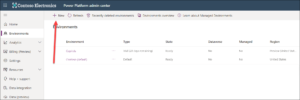
- Enter a new environment name, select region (United States or Preview (United States)), select a type (you can choose Trial for tests), and confirm using the Save

Preview Limitations of Copilot in Power Automate
You can’t edit flows with the Copilot experience if your flow has any of the following flows capabilities:
- A flow with an AI Builder or SAP connector, desktop flow, or a child flow component.
- A non-Open API flow (older connection format).
- A flow with a comment.
- A solution flow using connections instead of a connection reference.
- A flow contains an unsupported hybrid trigger. Hybrid triggers don’t require connections and are triggered manually from outside of Power Automate. Examples of hybrid triggers are for a selected item and a selected row.
- A flow contains a Power Apps V1 trigger.
- A flow contains a Power Pages component.
- A flow contains a response component.
Copilot has limited parameterization support currently.
It might not be able to implicitly fill in parameters for all your actions, but it should be available in select connectors.
- Copilot has limited support to create looping constructs (for example, Apply to each and do until).
- A solution flow using connections instead of connection reference isn’t supported. We recommend that you use a connection reference
- You can’t use Copilot if you’re using a personal Microsoft account. For example, you can’t use someone@live.com. Use a work or school account like someone@contoso.com
- Copilot supports the English language only for models.
How to Create A Flow in Copilot?
You have a proper region in Power Automate and now you can start using Copilot.
Navigate to the main Power Automate page
https://make.powerautomate.com/. Make sure that you selected the proper environment (1). There is a big text input box on top of the mage (2) – this is your input window to Copilot.
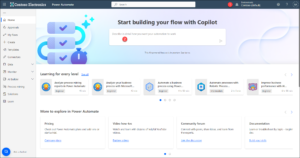
2. Describe Your Needs & Automation Scenario
As you’re typing, Copilot shows you a suggested list of Flows. This is the critical part of the entire process – the more specific the prompt, the better the Flow.
Start with a basic description and then enhance it, add more details, and check the results.
Use natural language to explain what you need and be as specific as possible. For example, instead of “Create tasks from my emails.”, try this “When a new e-mail arrives with the title Urgent, create a task in Planner”.
Microsoft published a good article about how to create a good prompt – https://news.microsoft.com/source/features/ai/the-art-of-the-prompt-how-to-get-the-best-out-of-generative-ai/. It is valid for ChatGPT, Midjourney, Copilots and other Large Language Models.
When you describe your scenario click on the Arrow to submit it.
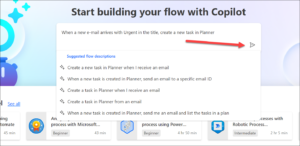
3. Power Automate will show you the suggested flow
(1). In this example, it proposed a trigger for Outlook, a condition, and a Create a task in Microsoft Planner. When it’s good enough click the Next button (2).
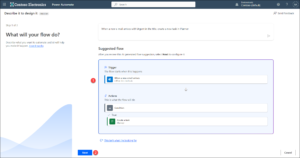
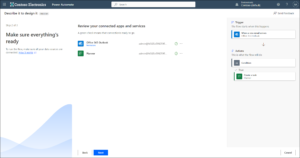
4. On the next page, you can configure suggested connections (if needed)
Now, confirm them using the Next
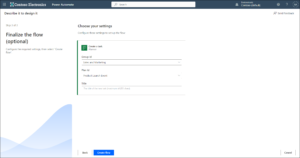
5. On the final page, you can configure Power Automate actions.
The number of actions to configure depends on Flow complexity. You do it at this stage or configure it directly from Flow Designer. Create the flow using the Create flow
6. Flows generated using Copilot use a brand-new Flow Designer.
It looks completely different from the current Designer and offers easier and faster navigation. It also has an embedded Copilot pane.

New Designer in Copilot
The brand-new, fresh, and modern Flow Designer has just arrived! It’s only available together with Copilot in the Public Preview version.
You can open any existing flow with the new Designer if it doesn’t contain unsupported actions or triggers (explained in the Introduction section).
Go to the My flows section in the Power Automate portal, click on the ellipsis next to the flow (1), click on Edit (2), and select the Edit with Copilot (preview) option.

3 Main Areas in The Flow Designer
- Canvas – you build the flow here. This is much better than the existing canvas. More freedom and easier zoom controls.
- Action configuration pane – you configure actions and triggers there. Instead of panes attached to flow blocks, all options are always visible on the left-hand side of the windows.
Much better in my opinion. No more hidden option panes or freezing windows (if you edit large flows, it can be really painful). - Copilot pane – the new pane dedicated to AI features. You can talk with Copilot there.
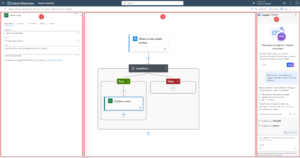
Canvas: Build the Flow
When the Action configuration pane is minimized, there are 4 additional options available for the Canvas area.
You can zoom in or zoom out the canvas, fit a view that fits the entire flow to your screen, and Toggle Minimap.
The last option shows you a minimap of your flow. This is helpful when you edit a large and complex flow and want to quickly find specific parts.

Action Configuration Pane
In the pane, you can configure all options of the selected trigger or action in your flow.
All options are clearly visible. By default, the Parameters section is displayed, but you can switch it to Settings, Code View, or other available sections.

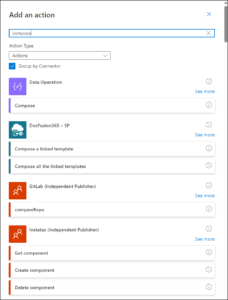
The Action configuration pane is also responsible for searching and adding new triggers or actions.
The Search is way faster than the existing one. All results are grouped by the Connector (for instance, SharePoint, Data Operations).
The Copilot Pane
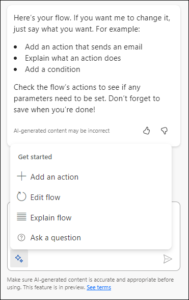
The Copilot pane is where the AI happens. There is welcome info, details of what you can do, etc., but the main part is at the bottom – the text input window where you can enter your prompts.

There are 4 types of prompts:
- Add an action – type which action should be added (for instance, add a send an e-mail action)
- Edit flow – you can ask Copilot to change your flow (for instance, remove Send notifications action)
- Explain flow – if you open a flow for the first time you can ask – what does this flow do
- Ask a question – if you need more information about specific action you can type – Tell me more about Compose action
You can talk with Copilot, explain what you want to add or change, get details about specific actions, and create your flow.
Wrapping it Up
Copilot in Power Automate gives a new way to create flows and modify them. You can quickly start building a flow with predefined logic and connections, so you don’t need to do all those things manually.
It’s really impressive when you play with it for a few hours – you will learn how to write the most effective prompts which gives you exactly what you expected.
The editing experience is also a big step forward. The Copilot pane gives you information about the flow, actions, and logic.
You can also use it to quickly update the existing diagram. The new designer is in my opinion the biggest change. It feels fresh, modern, and clean.
You can quickly find what you need and change the action properties from one window. Working with huge and complex flows is now much easier and faster. I highly recommend you test this Preview version.
Contact us by clicking here:


